Showing posts with label DIY. Show all posts

Thursday, November 18, 2010

TRAVEL Play MAT


PRETTY BABY ON TOP


.


Okay if you are worried about rope and babies - this is not the play mat for you - however my baby the wriggle glow worm that she is has not tangled at all - further more I left the gaps rather small and there is no slack on the rope when the play mat is out -

Okay lets start - I wanted it to like a cracked egg kinda of sort of..

 I cut out two oblong circles approximately 39 inches in in width


I then Cut two other oblong circles 5-6 inches smaller in width

 I cut double thick batting to measure

 Then created the quilt sandwich

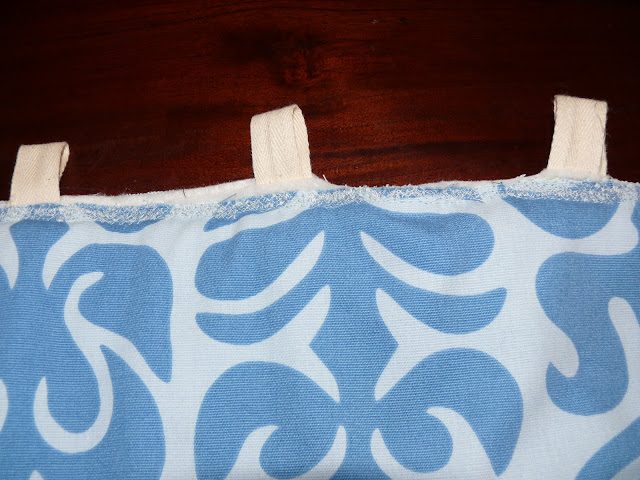
 I then free motion zig zag around the edge and inserted twill loop 4inches apart around the entire circumference of oblong circle

 I then free motion quilted the other two circles on top and quilted a flower on the smallest circle - but of course this open to so many wonderful interpretations.

DRAWN AND READY TO GO -

Thursday, November 4, 2010

QUICKEST TOTE IN THE WEST

These are simple quick charming little box totes perfect gifts for mothers and daughters - for our trip back, to visit my family in the Netherlands.

Also a great thank you presents for lovely people whom have helped our family this year.

Tools
fabric 
Twill 
Sewing machine


1.Cut two pieces 12 x 18 inch of fabric and try and make one of duck cloth thickness for thickness.
2. Fold inhalf and sew approx 1/2inch seam
3. Box the ends 4.5inch and DO NOT cut as adds a further stabilising effect to base of tote
4. Do for both peices of fabric 

5. Cut staps 14incch I always use twill simple and fast

6.  Right sides facing each pin straps approx 1.5 - 2  inches from side seam 
4. Sew and leave opening at side seam 
5 . Turn Inside out and iron - be sure iron in-between all steps 
6. top stitch 3 to 4 rows from top 
7. Enjoy 
 I thought perhaps I would do a wee giveaway leave a comment regarding favourite colour and will send one out to a lucky reader in two weeks with some felt bag jewellery.


Thursday, June 4, 2009

DIY FELT FRAME

So I made this photo frame out of felt for one of the many babies born to our clan. I was inspired by tiny photograph buried in the back of cotton time a Japanese craft magazine . So here is a tutorial on my version


Tools

Felt
Needle
thread
Snap Fastener
tiny bit of stuffing
Tiny bit of ribbon
Roving wool for dry felting

First I created a template - as I have no compass I used circular objects around the house - my circle measured 16.5cm and the inner circle 8.5cm


I then cut out the front piece from my gorgeous stash of felt from winterwood

Be careful when cutting the inner circle, I used a Stanley knife to make the initial cut.


In the name of economy the remaining circles were cut from ordinary felt that I purchased from spotlight. If I were feeling more extravagant I would use winterwood felt for the entire project - but alas this is my comprise.

I cut two doughnut rings and two full circles


Blanket stitch the inner circle of the two doughnut rings together


I then needle felted spots on the front of the frame - I think stripes would look way cool as well - imagination being your only limitation I suppose.


You need double thickness for the entire frame to provide stability.

Add snap fasteners to frame - position at the top. I went through both layers of the backing of the frame and just through the backing layer of the front of the frame


15cm piece of ribbon which I wrapped around the snap fastener of the back part of the frame


Looks like this


Now blanket stitch the outer side of the circle. Ensure you stitch all four layers together leaving a gap at the top of frame large enough to insert photo. Then stitch front and back layers separately.


You could leave it as is - but I decided to add a little somethin somethin. So a cut out a little bird shape - two identical pieces.


Stitch them together and gave the wee bird a gentle stuffing


Attach bird to top of frame - insert stunning photo of delicious baby and hang.

Thursday, April 9, 2009

easter bags

We have having yet an other gathering - it seems all roads lead to our house at the moment. We have invited 20 odd kids tomorrow, to come and decorate eggs - each child is to bring 6 hard boiled eggs and an art smock - I provide dye, glue and glitter - perhaps some chips and cordial as well.

And basically they can craft away until things get to out of control and then I will start dropping subtle hints for home time....

I wanted to make a party favour that concealed the chocolate contents and required adult supervision..........this is result

SUPPLIES
vellum strip 10.5cm x 29.5cm
one pretty pretty paper cut into eater shape approx 10cm long
sewing machine
chocolate surprises for inside


I traced egg shapes on the back of pretty pretty paper then cut out


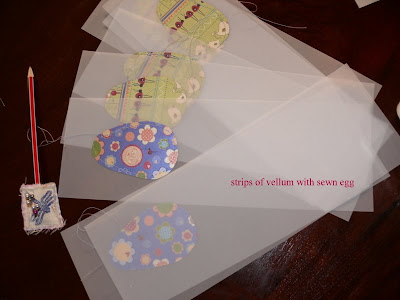
sew using sewing machine to vellum approx 4cm from the top of paper


strips of vellum ready to be folded


fold leaving a 2.5cm -3cm lip
sew sides using the zig zag stitch
a little pouch has been created


Insert Easter chocolate surprises we have supported the Bilby cause


fold lip over and sew shut !!!!!!!!!


ready and hidden!!!!!!!!!!!!!!!!

Bunny egg hider??????


Look I am not sure what these are - but I make them to put under the Easter bush and they hide/store an Easter egg - you could also use them as a egg warmer. This is a craft, older kids could easily manage - mine are still a wee bit young.

TOOLS
Felt embroider floss
needles
chopsticks
stuff

I drew a basic shape of a bunny and cut out 4 of decided shape in felt the ears are separate

Then I embroidered a face and stars on the Easter bunny front and back.


I then Sewed all four pieces together - walking foot helps with this. Hand stitching would be fine as well in fact I did a simple back stitch around the edge for looks.

Stuff between the layers leaving a cavity in the centre to hide or warm impending egg


Blanket stitch around the bottom

Hide egg

Hello Bunny

Wednesday, April 8, 2009

multipurpose egg warmers

Below is a quick DIY on egg warmers/chocolate egg holders, that turn into a glass coaster and napkin ring. The idea was to make them look like egg flowers before the are disassembled- I made 25 of them for a girls dinner and used them as a centrepiece- I forgot to take photos so you have to imagine the splendor of the evening. The centrepiece also became the party favour as they could take a couple home as an Easter treat.

This project was all about using up my stash of fabric SCRAPS- no purchase was made for this project - however I did eat into my felt stash. Hand on heart everything else came out of the scrap bag - so the whole look is RUSTIC....... and imperfect - as some fabric might not be quite square etc


TOOLS
2 x 13cm squares of light cotton fabric
1 x strip of felt 17.5cm x4cm felt
1x strip of slightly larger roughly cup fabric
1x small centre strip of contrasting fabric optional


Assemble napkin ring - I them top stitched around the upper edge of the felt and zig zagged around the centre scrap of fabric


Right side facing - sew strip together


For the coaster simply place fabric squares - right side facing - and sew. Leave an opening to turn inside out - using a chop stick gently push out corners and top stitch around the square.

The coaster requires lightweight fabric so you place egg in the centre of coaster and assemble into the napkin ring to create a egg flower/warmer.


Hope this is clear - Ing